Every static site needs a blog that we can pump full of content marketing filler. In this post, we'll author blog posts using Markdown and figure out how to build an index page for our blog posts.
- Markdown Blog Posts
- A Blog Index
- Gruntfile Modifications
Markdown Blog Posts
Let's get a vision for what we want our blog posts to look like. I recommend we place the posts in a subfolder of source/templates/pages, called blog. Our first post will be source/templates/pages/hello-blog.md:
---
title: Hello, Blog!
---
# {{title}}
This is our first blog post.
We also need to make a change to our Gruntfile to pick up *.md files.
        assemble: {
            hello: {
                options: {
                    data: 'source/data/*.{json,yml}',
                    layoutdir: 'source/templates/layouts',
                    layout: 'default.hbs',
                    partials: 'source/templates/partials/**/*.hbs',
                    collections: [
                        { name: 'navTags', inflection: 'navTag' }
                    ]
                },
                files: [
                    { expand: true, cwd: 'source/templates/pages', src: '**/*.{hbs,md}', dest: 'output/' }
                ]
            }
        },
On line 15, we changed the file spec to include both .hbs and .md.
If we run grunt build and look at the output, it's clear that this isn't quite enough.
While our {{title}} text was replaced, our markdown got directly included in the HTML
without additional rendering. This is because our default template, default.hbs,
simply dumps the body content into an HTML structure, assuming that the body is HTML.
We need a new template that renders the body content from markdown files.
Here is a first take on the blog layout, blog-layout.hbs:
{{#markdown}}
{{> body }}
{{/markdown}}
And we need to add a notation to the blog post YAML Front-Matter to specify the blog layout:
---
title: Hello, Blog!
layout: blog-layout.hbs
---
# {{title}}
This is our first blog post.
This is better, we can author our post in markdown, and our markdown is rendered as HTML. But the resulting page is missing the elegant design and sophisticated navigation scheme of our site. What would fix this is to make the blog layout a child layout, so the blog layout would inherit the overall site structure, but add a layer specific to blog pages. Since our site is still so minimal, this is easily changed by specifying a layout in blog-layout.hbs:
---
layout: default.hbs
---
{{#markdown}}
{{> body }}
{{/markdown}}
Building a Blog Index
You might have noticed we have no navigation to bring readers from our home page to our brilliant new blog post. A simple fix would be a Blog page, part of the top level navigation, which serves as the index for the blog. The blog index would include links to each post.
---
title: Blog
navTags:
- header
- footer
navLabel: Blog
navSort: 60
---
<h1>{{ title }}</h1>
This is obviously not enough. How do we iterate through the blog posts? How do we sort them, preferring the standard reverse chronological order? Can we display some or all of the content, rather than just a link?
Iterating Over Blog Posts
Let's apply some lessons from our previous navigation exercise, and create a 'navTag' for blog posts. This will be separate from the blog tags and categories, but allow us to build some navigation. First, we modify our post to include some additional data:
---
title: Hello, Blog!
layout: blog-layout.hbs
navTags:
 - blog
posted: 2014-10-01
author: James
---
# {{title}}
This is our first blog post.
We added both a 'blog' navTag, plus a posted date that we will use to sort our posts, and an author just in case anyone cares to associate themselves with our blog. Now we can add some post iteration code to our blog index page:
---
title: Blog
navTags:
- header
- footer
navLabel: Blog
navSort: 60
---
<h1>{{title}}</h1>
<div>
    {{#each navTags}}
        {{#is navTag "blog"}}
            {{#withSort pages "data.posted" dir="desc"}}
                <div>
                    <h2><a href="/{{relativeLink}}">{{data.title}}</a></h2>
                    <p>By {{data.author}} on {{data.posted}}</p>
                    <p><a href="/{{relativeLink}}">more...</a></p>
                </div>
            {{/withSort}}
        {{/is}}
    {{/each}}
</div>
This a start, but the date got spewed out in long format, and we would really benefit from a summary of the post.
The date is easily fixed, Assemble includes a
Handlebars helper for formatting dates,
{{#formatDate}}. For the summary, we need to add summary data to our blog post, and incorporate it
into the post body so you don't have to repeat yourself.
Improved Posts and Improved Post Indexing
We're going to expand on the data included in each blog post to include a summary, allowing the summary to be multiple lines of markdown. We will also reconfigure the way posts are templated into HTML, so the summary is included before the body, and there is no need to replicate the summary in the body text.
Here is our improved blog post, hello-blog.md, with the summary added and some formatting removed:
---
title: Hello, Blog!
layout: blog-layout.hbs
navTags:
 - blog
posted: 2014-10-01
author: James
summary: |
 This is the summary of our first
 blog post. It will cover:
  * Stuff
  * More Stuff
  * Even More Stuff
---
This is the lowly body of our first blog post.
The summary is the result of interesting YAML syntax. The pipe ("|") tells YAML to include the following indented lines, preserving newlines. The newlines are necessary for proper markdown rendering.
Now let's improve our blog layout, blog-layout.hbs, to provide formatting of the title, author, posted date, and summary:
---
layout: default.hbs
---
<h1>{{title}}</h1>
By {{author}} on {{formatDate posted "%F"}}
{{#markdown}}{{summary}}{{/markdown}}
{{#markdown}}
    {{> body }}
{{/markdown}}
Finally, our blog index, blog.hbs, will now use the summary as part of the post listing and includes better date formatting:
---
title: Blog
navTags:
- header
- footer
navLabel: Blog
navSort: 60
---
<h1>{{title}}</h1>
<div>
    {{#each navTags}}
        {{#is navTag "blog"}}
            {{#withSort pages "data.posted" dir="desc"}}
                <div>
                    <h2><a href="/{{relativeLink}}">{{data.title}}</a></h2>
                    <p>By {{data.author}} on {{formatDate data.posted "%F"}}</p>
                    <div>
                        {{#markdown}}{{data.summary}}{{/markdown}}
                    </div>
                    <p><a href="/{{relativeLink}}">more...</a></p>
                </div>
            {{/withSort}}
        {{/is}}
    {{/each}}
</div>
Testing the Blog Index
We need more than one post to prove this works. Here are two more awesome blog posts to stretch our legs with:
Second post -
---
title: Fluff
layout: blog-layout.hbs
navTags:
 - blog
posted: 2014-10-07
author: James
summary: |
 This post is all about fluff that provides the illusion of a vibrant, interesting blog.
---
I bought it from some hapless content author for peanuts, and it shows that they are clueless
about this business.  We do this to convince customers of our authenticity.
And third -
---
title: Keyword Stuffing
layout: blog-layout.hbs
navTags:
 - blog
posted: 2014-10-14
author: James
summary: |
 Keyword stuffing, discount keyword stuffing, and executive keyword stuffing is the topic of this keyword stuffing post.
---
We should link to some [keyword stuffing](#keyword-stuffing) sites and put some images with keyword stuffing
alt text in here.
How about now? Works on my machine.
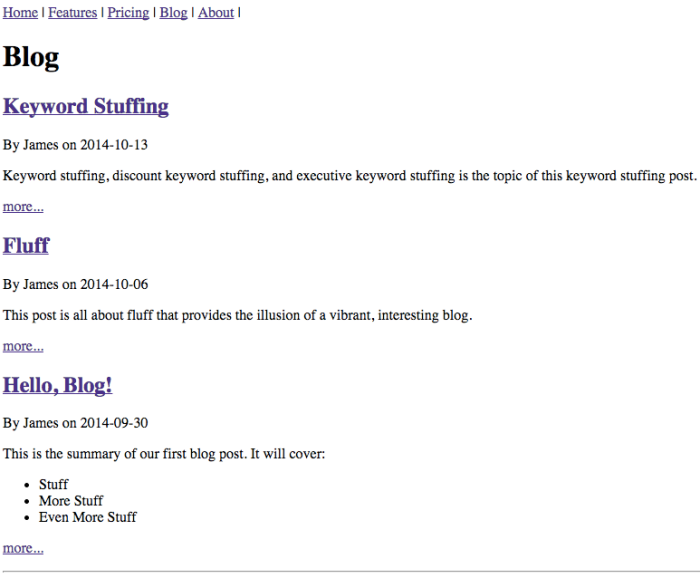
The reverse-chronological sorting works well, although the careful reader may note that I have a time zone issue.
Gruntfile Modifications
If you've made it this far, you might have noticed that our grunt-contrib-watch setup hasn't been helping us with Markdown files. We also forgot to modify it earlier for our custom navigation data. So I made a couple tweaks to Gruntfile.js to include our Markdown and JSON files in the Watch configuration:
        watch: {
            templates: {
                files: ['source/templates/**/*.{hbs,md}','source/data/**/*.json'],
                tasks: ['assemble']
            },
            livereload: {
                options: {
                    livereload: '<%= connect.preview.options.livereload %>'
                },
                files: ['output/**.*']
            }
        }
Assemble as a Blog Engine?
I'm a bit skeptical about using Assemble for any serious blog. Although I like the performance and cost benefits of a static site, I still think WordPress and similar tools have a huge advantage in editing experience, flexibility, to say nothing of features you will really want like sitemaps, media management, comment moderation, etc. It might be worth it if you really, really, really needed some custom features no responsible web host would allow.
But many of Assemble's features are intended for building a blog, and I believe it's worth learning how to use them regardless of the evil purpose you will eventually turn them to.
For the code, please see the learning-assemble repository on GitHub. The branch step06-blog-markdown contains the completed code from this post.

